Amlogic S905 SoC: bypassing the (not so) Secure Boot to dump the BootROM
Posted on Wed 05 October 2016 in Article
The Amlogic S905
System-On-Chip is an ARM processor designed for video
applications. It's widely used in Android/Kodi media boxes. The SoC
implements the TrustZone security extensions to run a Trusted
Execution Environment (TEE) that enables DRM & other security
features :
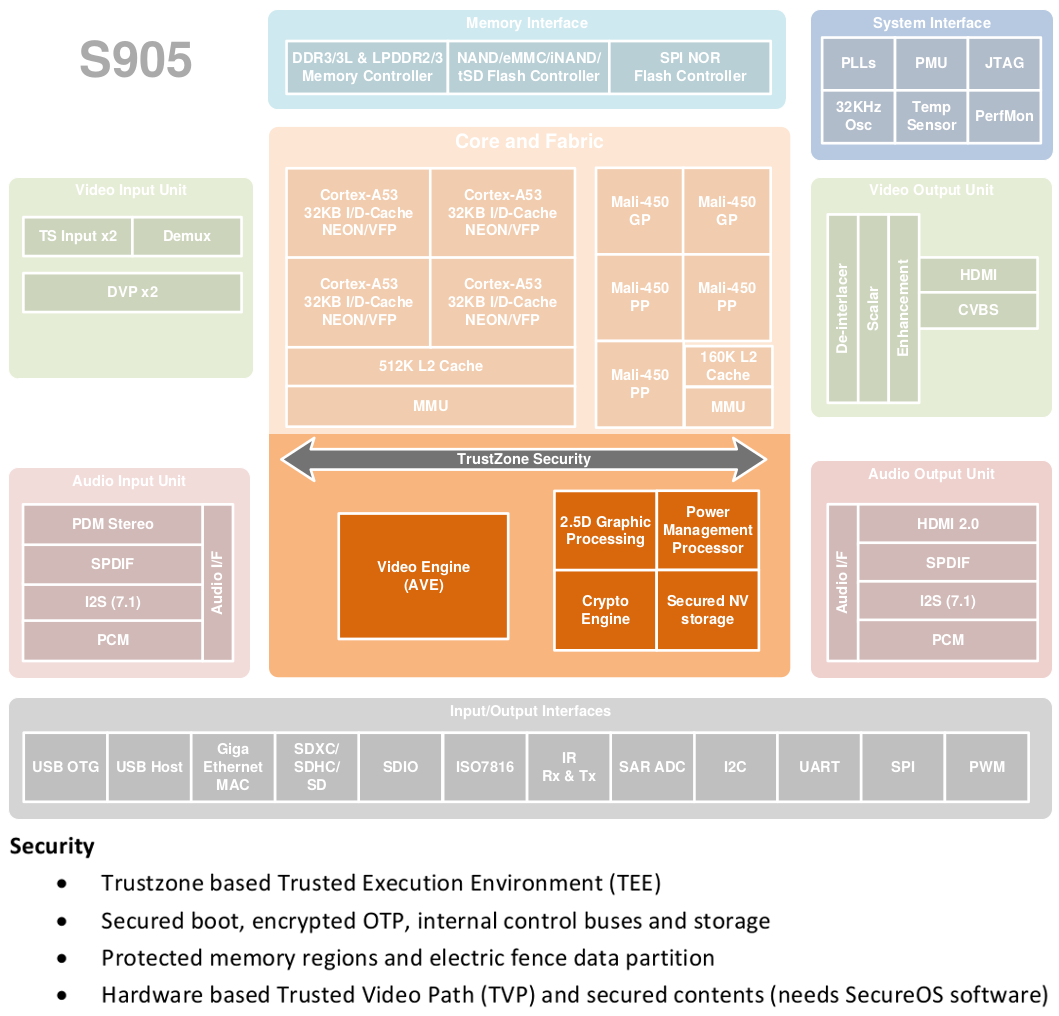
|
| Amlogic S905 System Block Diagram |
The SoC contains a Secure Boot mechanism to authenticate the TEE image before loading it in TrustZone. And the first link of this Secure Boot chain is the BootROM code, stored directly in the chip.
This articles describes how to extract the BootROM code from this SoC in the Android-based Inphic Spot i7 device.
Technical documentation
Amlogic released a public version of the S905 datasheet thanks to Hardkernel. However, it's heavily redacted, and most parts regarding the Secure Boot or the TrustZone have been removed. But we can still find a lot of technical information in GPL source code packages released by Amlogic & OEMs.For example, we can find a potential address for the BootROM code:
#define ROMBOOT_START   0xD9040000
#define ROM_SIZE        (64 * 1024)
#define ROMBOOT_END     (ROMBOOT_START + ROM_SIZE)
Root access over the UART
We start by connecting the serial port (or UART) because this
interface could provide a quick & easy access to debug messages &
serial console on bootloaders and Linux kernel.
Identifying the serial port on this board is quite simple
since there is a port header with labels for the pinout:
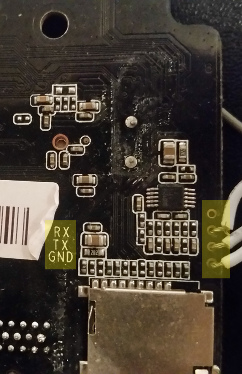
|
| UART on Inphic Spot i7 board |
We connect an USB to UART adapter to this port. Once the Linux kernel boot process is finished, we have directly access to a root shell.
We can start to explore the (Non-Secure side of the) system. For example, we can dump the partitions :
root@p200:/# ls -l /dev/block/platform/d0074000.emmc/
lrwxrwxrwx root     root              2015-01-01 00:00 boot -> /dev/block/boot
lrwxrwxrwx root     root              2015-01-01 00:00 bootloader -> /dev/block/bootloader
drwxr-xr-x root     root              2015-01-01 00:00 by-num
lrwxrwxrwx root     root              2015-01-01 00:00 cache -> /dev/block/cache
lrwxrwxrwx root     root              2015-01-01 00:00 crypt -> /dev/block/crypt
lrwxrwxrwx root     root              2015-01-01 00:00 data -> /dev/block/data
lrwxrwxrwx root     root              2015-01-01 00:00 env -> /dev/block/env
lrwxrwxrwx root     root              2015-01-01 00:00 instaboot -> /dev/block/instaboot
lrwxrwxrwx root     root              2015-01-01 00:00 logo -> /dev/block/logo
lrwxrwxrwx root     root              2015-01-01 00:00 misc -> /dev/block/misc
lrwxrwxrwx root     root              2015-01-01 00:00 mmcblk0 -> /dev/block/mmcblk0
lrwxrwxrwx root     root              2015-01-01 00:00 mmcblk0boot0 -> /dev/block/mmcblk0boot0
lrwxrwxrwx root     root              2015-01-01 00:00 mmcblk0boot1 -> /dev/block/mmcblk0boot1
lrwxrwxrwx root     root              2015-01-01 00:00 mmcblk0rpmb -> /dev/block/mmcblk0rpmb
lrwxrwxrwx root     root              2015-01-01 00:00 recovery -> /dev/block/recovery
lrwxrwxrwx root     root              2015-01-01 00:00 reserved -> /dev/block/reserved
lrwxrwxrwx root     root              2015-01-01 00:00 rsv -> /dev/block/rsv
lrwxrwxrwx root     root              2015-01-01 00:00 system -> /dev/block/system
lrwxrwxrwx root     root              2015-01-01 00:00 tee -> /dev/block/tee
(Fail at) Reading the BootROM
Since we have root permissions and a potential memory address for
the BootROM, we can try to read it directly. The provided Android
ROM contains a handy debugfs interface to peek & poke physical
memory from user-land:
root@p200:/# echo "d0070000" >/sys/kernel/debug/aml_reg/paddr
root@p200:/# cat /sys/kernel/debug/aml_reg/paddr
[0xd0070000] = 0x1000254
root@p200:/# echo "d9040000" >/sys/kernel/debug/aml_reg/paddr
root@p200:/# cat /sys/kernel/debug/aml_reg/paddr
[  376.546491@0] Unhandled fault: synchronous external abort (0x96000010) at 0xffffff80001aa000
[  376.549396@0] Internal error: : 96000010 [#1] PREEMPT SMP
[  376.554712@0] Modules linked in: dwc_otg dhd(O) aml_thermal(O) mali(O) aml_nftl_dev(PO)
Enter the Secure World
A quick inspection of debug logs from the UART during the early phases of boot indicates that the bootloaders are based on the ARM Trusted Firmware (ATF) reference implementation.
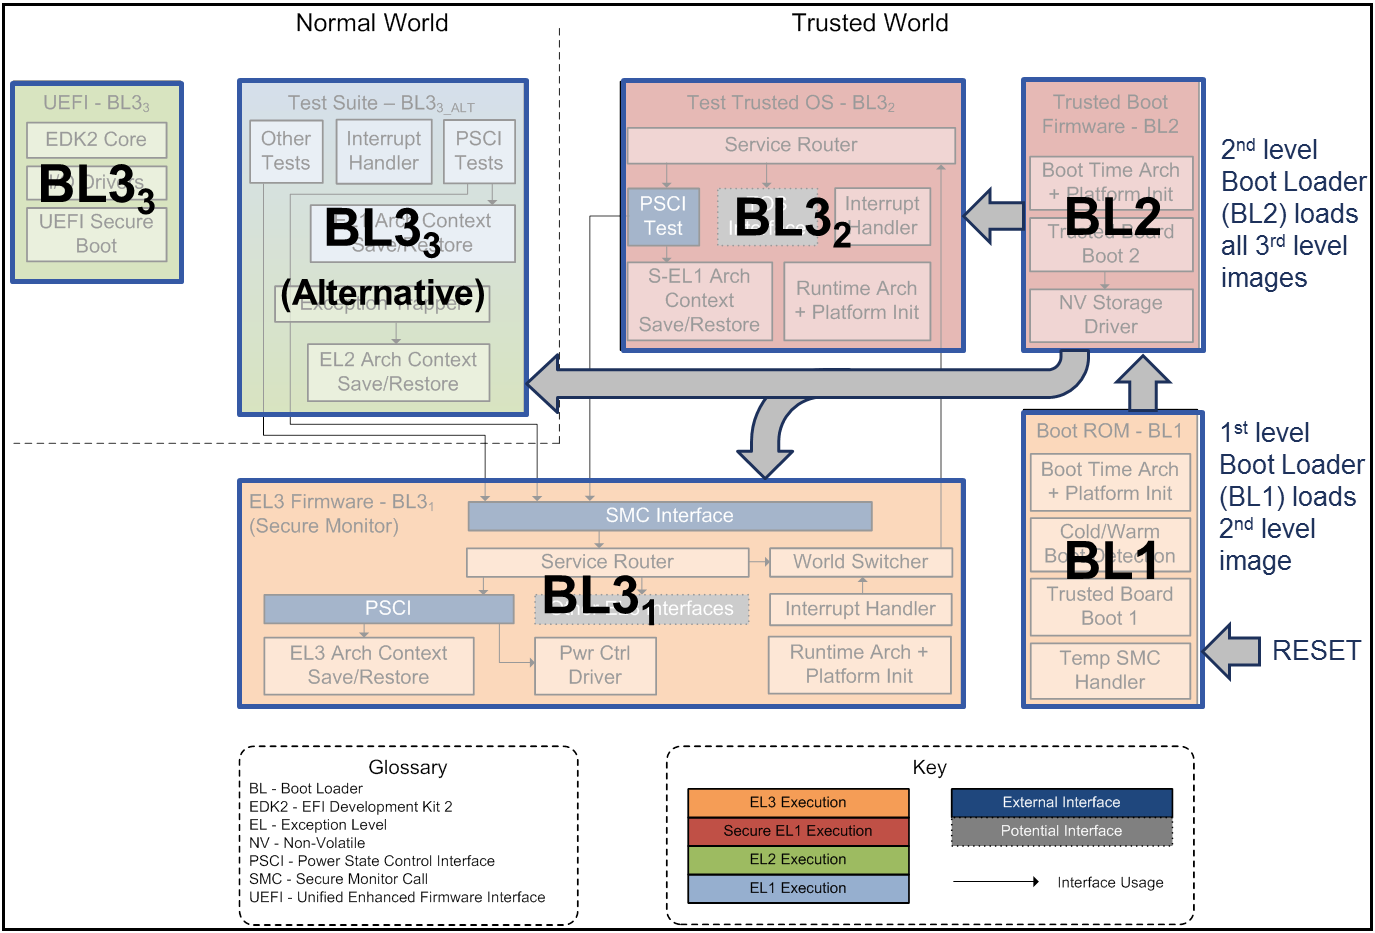
|
| ARM Trusted Firmware Design |
U-Boot bootloader
Using the console over UART, we can interrupt the U-Boot boot sequence to access to the prompt. From here we can run arbitrary U-boot commands:Hit any key to stop autoboot: 0However the U-Boot bootloader (named BL33 in the ATF design) runs in Non-Secure mode as we can see in boot logs from the UART console:
gxb_p200_v1#help
? - alias for 'help'
aml_sysrecovery- Burning with amlogic format package from partition sysrecovery
amlmmc - AMLMMC sub system
amlnf - aml nand sub-system
amlnf_test- AMLPHYNAND sub-system
autoping- do auto ping test
autoscr - run script from memory
INFO: BL3-1: Preparing for EL3 exit to normal worldSo at this point we are already locked out of the Secure World. Next.
INFO: BL3-1: Next image address = 0x1000000
INFO: BL3-1: Next image spsr = 0x3c9
U-Boot 2015.01-ga9e9562-dirty (May 06 2016 - 03:36:02)
SMC interface
Secure & Non-Secure Worlds can communicate through the ARM Secure Monitor Call (SMC). When a core executes the SMC instruction, it switches to Secure Monitor mode (exception level EL3).The open-source ATF code base in the BL31 image facilitates the analysis by reverse engineering, since we can quickly recover the ATF code structure.
Here is the list of registered services that handle SMC interrupts from Normal World:
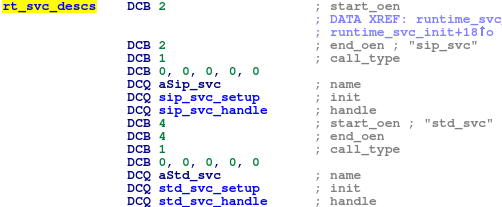
|
| Registered services in BL31 image |
The sip_svc service is interesting because it contains several custom functions developed by Amlogic:
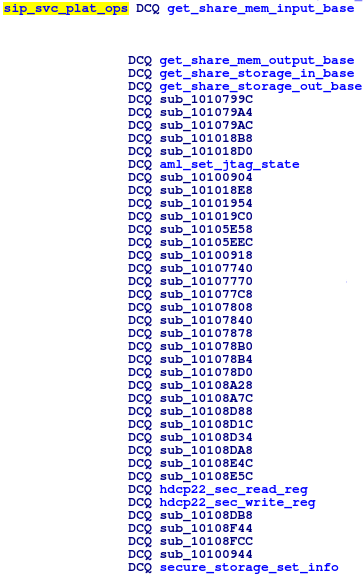
|
| List of handlers in the SIP service |

|
| Function hdcp22_sec_read_reg decompiled |
We may be able to trigger Secure World memory corruption from the Normal World if we find bugs in one of these functions, and then achieve privilege escalation to Secure World. However that would require some expert skills to actually exploit them. So let's explore another attack vector.
Bypass the Secure Boot chain
Here start the lengthy process of reverse engineering a binary without any syscall and very few strings to guide our efforts. Fortunately, the BL2 image is quite small: ~40KB. And we have some ideas to save time:
Like BL31, the BL2 image follows the ATF code logic, so reverse engineering efforts are a bit simplified: we can quickly spot main functions & structures defined in the ATF code base.
Finally, we don't want to spend time reversing open source code, especially cryptographic code because the task is quite hard. And since it's also complex from the developer perspective, we can expect they used a library, which may be open source. So we looked for similarities in function prototypes, call sequence & initialization of context structures between BL2 code and few potential OSS libraries. In our case, we quickly figured out that the cryptographic code comes from the OSS PolarSSL/mbed TLS project.
Analyzing BL2 authentication routine
Once BL2 has loaded the BL3 image from the NAND, the header is parsed. We don't have any information on the header structure yet (not present in the ATF code), but we can notice it starts with a constant magic value "@AML". This helps to quickly locate the parsing code in the BL2 binary.We combine "guessing" (i.e. looking at the BL31 header in a hex editor) and reverse engineering of the BL2 parsing code to figure out some members of the header structure:
struct aml_img_header {
  unsigned char magic[4];// "@AML"
  uint32_t total_len;
  uint8_t header_len;
  uint8_t unk_x9;
  uint8_t unk_xA;
  uint8_t unk_xB;
  uint32_t unk_xC;
  uint32_t sig_type;
  uint32_t sig_offset;
  uint32_t sig_size;
  uint32_t data_offset;
  uint32_t unk_x20;
  uint32_t cert_offset;
  uint32_t cert_size;
  uint32_t data_len;
  uint32_t unk_x30;
  uint32_t code_offset;
  uint32_t code_len;
  uint32_t unk_x3C;
} aml_img_header_t;
The header indicates that the image is split in 4 parts:
- header : always 64 bytes
- signature : RSA-1024, RSA-2048, RSA-4096 or SHA-256
- cert : x509 certificate
- code: payload
The following pseudocode is the simplified algorithm of the authentication routine in BL2 :
int auth_image(aml_img_header_t *img){
  validate_header(img); // checks on magic value & header length
  hash = hash_sha256(img);// hash whole image except signature
  if(img->sig_type == RSA) {
    return check_rsa_signature(img, hash)
  }else{
    return memcmp(hash, (char*)img + (img->sig_offset));
  }
}
We can confirm that the SHA-256 option will only hash the loaded
image and compare the result against the precomputed hash in the
same image. We could have imagined a more complex solution like a
HMAC, but actually in this case only the integrity is checked,
there is no authentication.
And even if the loaded image is signed with RSA, we can still
switch the signature type to SHA-256 and regenerate the correct
hash.
This issue could have been avoided if the signature type was
enforced by an eFuse.
This means we can easily modify the BL31 image, the most privileged
code in TrustZone.
Customizing BL31 image
In a previous section, we described the SMC function hdcp22_sec_read_reg that can read restricted ranges of secure memory from Normal World.Time to practice our NOPing-fu to get rid of these limitations and thus obtain full access to secure memory.
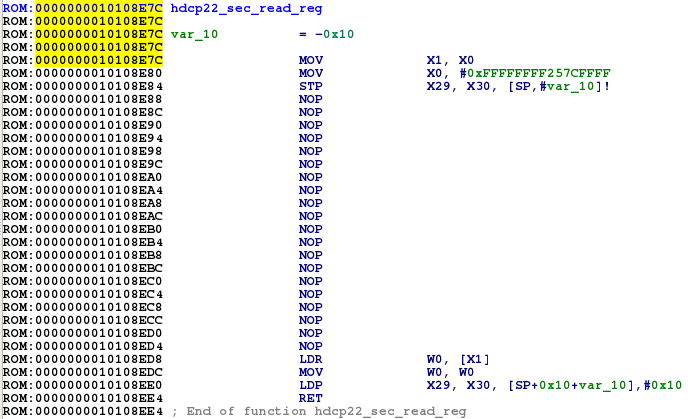
|
| Modified hdcp22_sec_read_reg function |
We also need to extend the page tables because the BootROM memory area is not mapped. The MMU initialization is implemented in the ATF code base, so again this is easy to spot and analyze in the BL31 binary.
By default, the following memory regions are mapped:

|
| Original list of memory regions mapped in BL31 |
We extend the size of one of them to cover the BootROM region:

|
| Modified list of memory regions mapped in BL31 |
The new size of mapped region 0xD9000000 is 0x80000 so it includes the BootROM area 0xD9040000-0xD9050000.
We're almost done with BL31 modifications: we still need to update the SHA-256 hash.
aml_bootloader_tool: parse and rehash Amlogic bootloaders
This tool can parse and regenerate the SHA-256 of bootloaders contained in the bootloader partition. The source code is on GitHub.Each bootloader is identified by an UUID, they are defined in the ATF source code. In our case, the BL31 image is entry #2:
$ ./aml_bootloader_tool ./dump/bootloader.img H 2
fip_toc_header.name:        aa640001
fip_toc_header.serial_number:        12345678
fip_toc_header.flags:        0
TOC ENTRY #2
fip_toc_entry.uuid:        47D4086D4CFE98469B952950CBBD5A00
fip_toc_entry.offset_address:    14000 (absolute: 0x20000)
fip_toc_entry.size:        0x11130
fip_toc_entry.flags:        0x0
magic[@0x0]:        @AML
total_len[@0x4]:    0x11130
header_len[@0x8]:    0x40
unk_xC[@0xC]:        0x5eec9094
sig_type[@0x10]:    0x0
sig_offset[@0x14]:    0x40
sig_len[@0x18]:        0x20
data_offset[@0x1c]:    0x60
unk_x20[@0x20]:        0x0
cert_offset[@0x24]:    0x60
cert_len:        0x0
data_len:        0x110d0
unk_x30[@0x30]:        0x0
code_offset[@0x34]:    0x60
code_len[@0x38]:    0x110d0
unk_x3C[@0x3C]:        0x0
signature:        263BEFAFC5A051C550D31791EC1212576BE65DB8AD365074560F0BABC076D3CA
computed_sha256:    35AD6B284EE2D6B5672DD0958592028D5BF455A6DCD1EB086D8336FB86533853
The hash of the BL31 image has been updated, we can now reflash the
dump on the device:
$ dd if=./bootloader.img of=/dev/block/bootloader
Finally, we reboot the device to load our customized BL31 image in
TrustZone.
Dumping the BootROM
The SMC system call can only be invoked from EL1 and above. So we create a simple kernel module that will perform SMC calls to our modified function hdcp22_sec_read_reg in EL3.This quick 'n dirty hack is based on the Amlogic debugfs driver reg_access. The source code is on GitHub.
Once loaded, to initiate a SMC call, we write arguments to the file /sys/kernel/debug/aml_smc/smc. The first argument is the ID of the called SMC function (0x82000018 in the case of hdcp22_sec_read_reg). The second argument (for this specific SMC ID) is the read memory address. The result DWORD is directly printed in kernel logs (we said dirty).
$ insmod ./smc_access.ko
$ echo 82000018 D9040000 > /sys/kernel/debug/aml_smc/smc
[  219.092948@0] smc_access: SMC call 82000018 returns: aa1f03e0
To automate the extraction of the entire BootROM memory region, we create a simple script:
$ seq -f %1.f 0xD9040000 0x4 0xD9050000 | xargs printf "echo \"82000018 %x\" > /sys/kernel/debug/aml_smc/smc\n"
echo "82000018 d9040000" > /sys/kernel/debug/aml_smc/smc
echo "82000018 d9040004" > /sys/kernel/debug/aml_smc/smc
echo "82000018 d9040008" > /sys/kernel/debug/aml_smc/smc
[...]
echo "82000018 d904fff8" > /sys/kernel/debug/aml_smc/smc
echo "82000018 d904fffc" > /sys/kernel/debug/aml_smc/smc
$ ls -l ./bootrom.bin
-rw-r--r-- 1 user user 65537 juil.  8 12:43 ./bootrom.bin
$ sha1sum bootrom.bin
bff0c7fb88b4f03e732dc7a4ce504d748d0d47dd  bootrom.bin
$ strings bootrom.bin |tail -22
BL1:
FEAT
READ
EMMC
NAND
LOOP
auth failed, reboot...
08dafda0fd31778
glacier.amlogic
qian
04/14/15_14:23:08
gcc version 4.8
08dafda0fd31778
boot@USB
boot@SDC
BAD PASSWORD
!!!!
vRQ>
8STs
LwH'
Err:sha
0!0
Conclusion
The S905 SoC provides hardware features to support Secure Boot,
however OEMs can still choose to enable it or not. But even when
Secure Boot is enforced, a flaw in the current version of Amlogic's
BL2 allows to bypass it. So Trusted Execution Environment cannot be
trusted. The good news is BL2 can be patched, unlike BootROM.
I would like to thank @Karnalzi for the help!
Disclosure Timeline
2016-08-08 : Flaw discovered2016-08-08 : Amlogic & some affected OEMs contacted by email to find a security PoC
2016-08-10 : OEM #1 replies that "Amlogic doesn't provide any direct contact."
2016-08-20 : Second attempt to contact Amlogic by email
2016-09-05 : Bug report shared with Amlogic
2016-09-13 : Status update requested
2016-09-25 : Status update requested
2016-10-05 : Public disclosure